


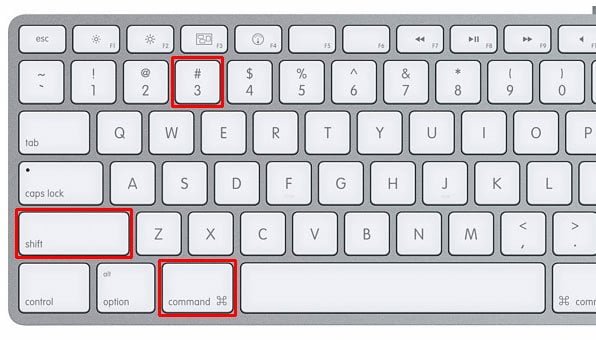
To screenshot on an iMac, simply press the Command + Shift + 3 keys simultaneously.
:max_bytes(150000):strip_icc()/ScreenShot2020-09-30at4.39.47PM-4a044b8bbc5f4974a14b639a836f4cee.png)
Credit: www.lifewire.com
Introduction To Screenshot On Imac
Learn how to easily screenshot on your iMac without the need for any additional tools or software. Follow these simple steps to capture and save any image or screen on your iMac effortlessly.
Knowing how to take a screenshot on your iMac can be a valuable skill that makes capturing and sharing information quick and efficient. Whether you need to capture an error message, save an image, or provide step-by-step instructions, screenshots are a versatile tool that can help you communicate effectively. In this blog post, we will explore what a screenshot is, discuss why you might need to take screenshots on your iMac, and explore different methods for capturing screenshots on this Apple device.
What Is A Screenshot?
A screenshot is simply a digital image of your computer or device’s screen. It captures what is currently displayed on the screen, making it a useful way to preserve and share information. Screenshots are commonly used for various purposes such as troubleshooting technical issues, demonstrating a specific feature or setting, documenting online transactions, or even capturing memorable moments from videos or games.
Why Do You Need To Take Screenshots?
There are several reasons why you might need to take screenshots on your iMac, including:
- To document and troubleshoot technical issues: Taking screenshots can help you communicate more effectively with technical support or colleagues by providing visual evidence of error messages, software bugs, or other issues.
- To capture important information: Screenshots allow you to save web pages, documents, or images for later reference without having to bookmark or download files.
- To create tutorials or instructional materials: If you need to teach someone how to perform a specific task on their iMac, screenshots can be a helpful visual aid to guide them through the steps.
- To share content on social media or presentations: Screenshots are an easy way to share interesting content, memes, or snippets of conversations with others.
- To keep a record of online transactions: Taking screenshots of your online purchases, reservations, or transactions can help you keep track of important details such as order numbers, payment confirmations, or booking references.
Now that we understand the importance of screenshots, let’s explore the different methods available for capturing screenshots on your iMac:
- Method 1: Using Keyboard Shortcuts: iMac offers built-in keyboard shortcuts that allow you to take screenshots quickly. For example, pressing
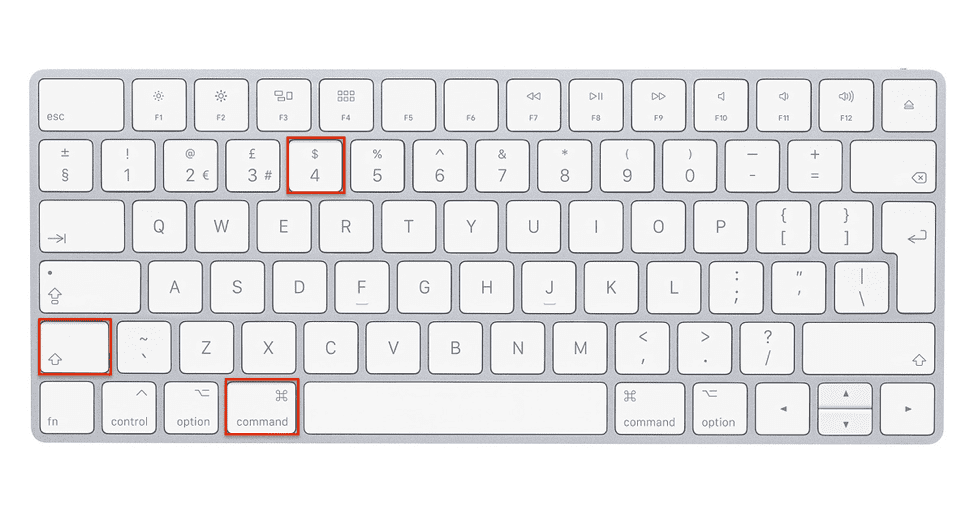
Command + Shift + 3captures the entire screen, while pressingCommand + Shift + 4allows you to select a specific portion of the screen to capture. - Method 2: Utilizing the Screenshot App: iMac also has a built-in Screenshot app that provides more customization options. You can access it by pressing
Command + Shift + 5. This app allows you to choose between capturing the entire screen, a specific window, or a custom selection. It also offers features like a timer, options for saving and annotating screenshots, and even recording screen videos. - Method 3: Third-Party Apps: If the built-in options don’t meet your needs, you can explore third-party apps available in the App Store, such as Apowersoft Screenshot or CloudApp – Screen Capture. These apps often offer additional features and flexibility in capturing and editing screenshots.
Now that you have a good understanding of screenshots and the different methods available on your iMac, you can start capturing and sharing information more efficiently. Experiment with the various methods and find the one that works best for your specific needs. Screenshotting on your iMac has never been easier!
Credit: www.parallels.com
Methods For Taking Screenshots On Imac
If you’re an iMac user, you may have found yourself wanting to capture what’s on your screen. Whether you want to save an important document, share an interesting article, or capture a funny moment in a video, taking screenshots on iMac is quick and easy. In this article, we’ll explore three methods for taking screenshots on iMac: using keyboard shortcuts, utilizing the Screenshot Toolbar, and employing third-party apps.
Using Keyboard Shortcuts
One of the simplest and most efficient ways to take a screenshot on iMac is by using keyboard shortcuts. These shortcuts allow you to capture different portions of your screen with just a few key presses. Here are some commonly used keyboard shortcuts for taking screenshots on iMac:
| Keyboard Shortcut | Description |
|---|---|
Command + Shift + 3 | Captures the entire screen and saves it as a file on your desktop. |
Command + Shift + 4 | Turns your cursor into a crosshair, allowing you to select a specific area to capture. The captured screenshot is saved as a file on your desktop. |
Command + Shift + 4 + Spacebar | Changes your cursor into a camera icon, allowing you to take a screenshot of a specific window. The captured screenshot is saved as a file on your desktop. |
Using The Screenshot Toolbar
If you prefer a more visual approach to taking screenshots, iMac also offers a handy Screenshot Toolbar. This built-in tool provides a user-friendly interface and additional controls for capturing your screen. To access the Screenshot Toolbar:
- Press Shift + Command + 5 to open the Screenshot Toolbar.
- The toolbar will appear at the bottom of your screen, offering various options for capturing screenshots. You can choose to capture the entire screen, a selected portion, or even record a video of your screen.
- Once you’ve made your selection, simply click on the corresponding button in the Screenshot Toolbar to capture your screen.
Using Third-party Apps
If the built-in options don’t meet your specific needs, you can always explore third-party apps for capturing screenshots on iMac. These apps offer additional features and customization options, allowing you to enhance your screenshot-taking experience. Some popular third-party apps for capturing screenshots on iMac include:
- App Store
- Apowersoft Screenshot
- CloudApp – Screen Capture
These apps can be easily downloaded and installed from the App Store, and they provide a range of functionalities that go beyond the standard screenshot-taking capabilities of iMac.
Whether you prefer the simplicity of keyboard shortcuts, the convenience of the Screenshot Toolbar, or the advanced features of third-party apps, capturing screenshots on iMac is a breeze. Choose the method that suits your needs and start capturing and sharing your screen in no time!
Advanced Screenshot Techniques On Imac
If you own an iMac, you probably already know how to take a basic screenshot. But did you know that there are several advanced screenshot techniques that can make your screen capturing experience even better? In this article, we will explore some of these advanced techniques, including cropping a screenshot, taking screenshots of specific windows or portions of the screen, recording screen capture videos, taking long screenshots, and customizing screenshot options. Let’s dive in!
Cropping A Screenshot
If you want to highlight a specific area of your screenshot, cropping it can be a great option. Cropping allows you to remove unnecessary parts of the image, making it more focused and visually appealing. To crop a screenshot on your iMac, follow these steps:
- Take a screenshot of the entire screen using the appropriate keyboard shortcut.
- Open the screenshot in the Preview app by double-clicking on it.
- Click on the “Markup” toolbar button at the top of the Preview window.
- Select the “Crop” tool from the toolbar.
- Adjust the cropping frame to the desired area of the screenshot.
- Click “Apply” to crop the screenshot.
- Save the cropped screenshot by selecting “File” > “Save” from the top menu.
Taking Screenshots Of Specific Windows Or Portions Of The Screen
Sometimes, you only need to capture a specific window or a portion of the screen instead of the entire screen. Fortunately, iMac allows you to do this easily. To take a screenshot of a specific window or portion of the screen on your iMac, follow these steps:
- Press the appropriate keyboard shortcut to capture the whole screen or select a portion of the screen.
- While the screenshot preview is displayed in the bottom-right corner of the screen, click on it to open it in the Preview app.
- Click on the “Markup” toolbar button in the top-right corner of the Preview window.
- Select the tools you need to annotate or highlight the specific window or portion of the screen captured.
- Save the screenshot by selecting “File” > “Save” from the top menu.
Recording Screen Capture Videos
Do you want to show someone how to perform a specific task on your iMac? Recording a screen capture video can be the most effective way to do it. Here’s how you can record a screen capture video on your iMac:
- Press the appropriate keyboard shortcut to start recording.
- A recording toolbar will appear at the top of the screen.
- Click on the red “Record” button to start recording.
- Perform the desired actions on your iMac.
- Click on the recording toolbar again to stop the recording.
- The video will be saved to the location specified in your settings.
Taking Long Screenshots
Have you ever come across a webpage or document that you wanted to capture in its entirety? With iMac, you can take long screenshots that capture the entire length of a webpage or document. To take a long screenshot on your iMac, follow these steps:
- Take a screenshot of the visible portion of the webpage or document using the appropriate keyboard shortcut.
- Hover over the screenshot preview in the bottom-right corner of the screen.
- Click on the “Full Page” button that appears.
- The iMac will automatically scroll the webpage or document and capture each section.
- Once the scrolling is complete, the long screenshot will be saved to the location specified in your settings.
Customizing Screenshot Options
iMac provides several options to customize your screenshot settings according to your preferences. To customize your screenshot options on iMac, follow these steps:
- Go to the “System Preferences” from the Apple menu.
- Click on “Keyboard” and go to the “Shortcuts” tab.
- Select “Screen Shots” from the left-hand menu.
- Customize the keyboard shortcuts for different types of screenshots.
- Enable or disable the options for showing the mouse pointer, including date and time, and more.
- Exit the “System Preferences” window once you have made the desired changes.
With these advanced screenshot techniques at your disposal, you can enhance your productivity and creativity on your iMac. Whether it’s cropping a screenshot, capturing specific windows, recording screen capture videos, taking long screenshots, or customizing screenshot options, iMac offers a variety of options to cater to your needs. Start exploring these advanced techniques and elevate your iMac screenshot game!

Credit: www.businessinsider.com
Frequently Asked Questions For How To Screenshot On Imac
How Do I Capture A Screenshot On My Mac?
To capture a screenshot on your Mac, you can use keyboard shortcuts. Press Command + Shift + 3 to capture the entire screen. To capture a specific part of the screen, press Command + Shift + 4, then select the desired area.
The screenshot will be saved on your desktop.
How Do I Capture A Screenshot?
To capture a screenshot on a Mac, press and hold the “Command + Shift + 3” keys simultaneously. This will capture the entire screen. If you want to capture a specific portion of the screen, press and hold “Command + Shift + 4” and then select the area you want to capture.
How Do You Take A Screenshot Of A Long Page On A Mac?
To take a screenshot of a long page on a Mac, you can use the built-in screenshot tool. Press Command + Shift + 3 to capture the entire screen. Alternatively, press Command + Shift + 4 to select a specific area to capture.
Scroll the page until you see the desired content, and then capture the screenshot as usual.
How Do You Snip And Paste On A Mac?
To snip and paste on a Mac, use the following keyboard shortcuts:1. Snip: Press Command + Shift + 4, then drag the crosshair cursor to select the area you want to capture. 2. Copy: Press Command + C to copy the snipped area to the clipboard.
3. Paste: Press Command + V to paste the snipped area into another document or application. That’s it! You have successfully snipped and pasted on your Mac.
Conclusion
Taking a screenshot on an iMac is a simple and straightforward process. Whether you want to capture the entire screen or a specific portion, there are various methods you can use. From using keyboard shortcuts to accessing the screenshot menu, you have plenty of options.
Additionally, you can customize your screenshots and take your own unique images. With these easy-to-follow steps, you can efficiently capture and save important information on your iMac. So go ahead and start taking screenshots like a pro!
